How to Edit a Travel Video: The Complete Guide
How to Edit a Travel Video: The Complete Guide
Filming travel videos is one of the hottest trends right now and everyone under the sun seems to have a new travel blog and everyone is shooting video. And what is a video worth if it is just a collection of clips sitting on a hard drive?
Editing videos feels like a terrifying job, and I get it, there are some skills and things you need to learn, but once you do you’ll be editing those travel videos in no time with a few tips and tricks we’re happy to share.
If you are serious about creating amazing travel videos, and have an audience that you expect to follow along, subscribe, share and engage with, filming cool shots simply isn’t enough - you need to know how to edit them all together to tell a story too.
How to Edit a Travel Video Part 1: Organization and Trouble-shooting
First off, we need to set the table and clean the house. So you’ve just got back from an amazing safari in Tanzania, cool! Where are all the videos? Did you film on an iPhone? 2 iPhones? Are they backed up to iCloud? Where are the originals? Did both phones film the same frame rate? What’s frame rate?
Relax, relax, we’ve got your back.
So let’s start with the camera you’re using to film your travel video. Since we started filming our adventure travel videos, we’ve only ever used our iPhones. They are super easy to shoot with, always on us, and easy to carry around. Remember, the best camera isn’t the most fancy or expensive, it is the one you have with you at all times.
Since we each film, we need to set some ground rules and standards when filming. First, we make sure our settings are the same and so should you. We film everything in 30fps. Just make sure your timeline is set up the same as well before you edit, but we’ll get to that later.
We also film a lot of content in slow motion, so if you do the same, take a look at your camera settings and make sure your phone is filming however you want it to.
On an iPhone, go to Settings - Camera - Record Video. We have ours set to 1080p HD at 30fps. For Record Slo-mo we set it to 1080p at 120fps. We use the 120fps instead of the even slower 240fps, because dropping it down to 240fps also drops the video quality to 720p, which is very noticeable in the end, but it’s up to you.
If you’re on a Samsung, or something else, good luck! We couldn’t work one of those phones if our lives depended on it.
Lastly before we get started, make sure your file storage is all set up how you like it. We turn off iCloud for our phone storage for video because this can cause a nightmare when trying to copy the files.
If you go to copy over your phone and half the clips aren’t actually stored on your phone, but re up in cyberspace on the cloud, getting them off and back down to Earth can be a huge pain in the butt, trust us.
We keep all clips locally stored on our individual phones, copy off every clip using the free Mac software Image Capture, at the end of every shooting day and then back up each days filming on a second external drive as well.
I make separate folders for Anne and my footage, as well as one for “Drone” and one for “GoPro”.
This leaves us with the original copies on our iPhones, a copy on our laptop and a third on a hard drive. Maybe it is overkill but it lets me sleep at night.
Ok, on the to the actual editing!
How to Edit a Travel Video Part 2: Editing Software and Timeline
Now that all our clips are organized and backed up, we can start thinking about editing them all together.
Over the years, I have edited on Final Cut and Adobe Premiere, and after spending years on both I recently settled on FCPX, and after a few months of wanting to rip my head off, we have come to respect each other.
For the purposes of this article, I will be using FCPX, which we use, but all the basic rules of how to edit a travel video will apply to whichever you pick as we’ll be speaking more about the rules of editing, and not the tech side. If you are a bit more advanced you can look at using Adobe Premiere, and if you are after something more simple you can use the same logic on iMovie.
If you are interested in trying our FCPX, you can download a free 30-day trial and see how it goes.
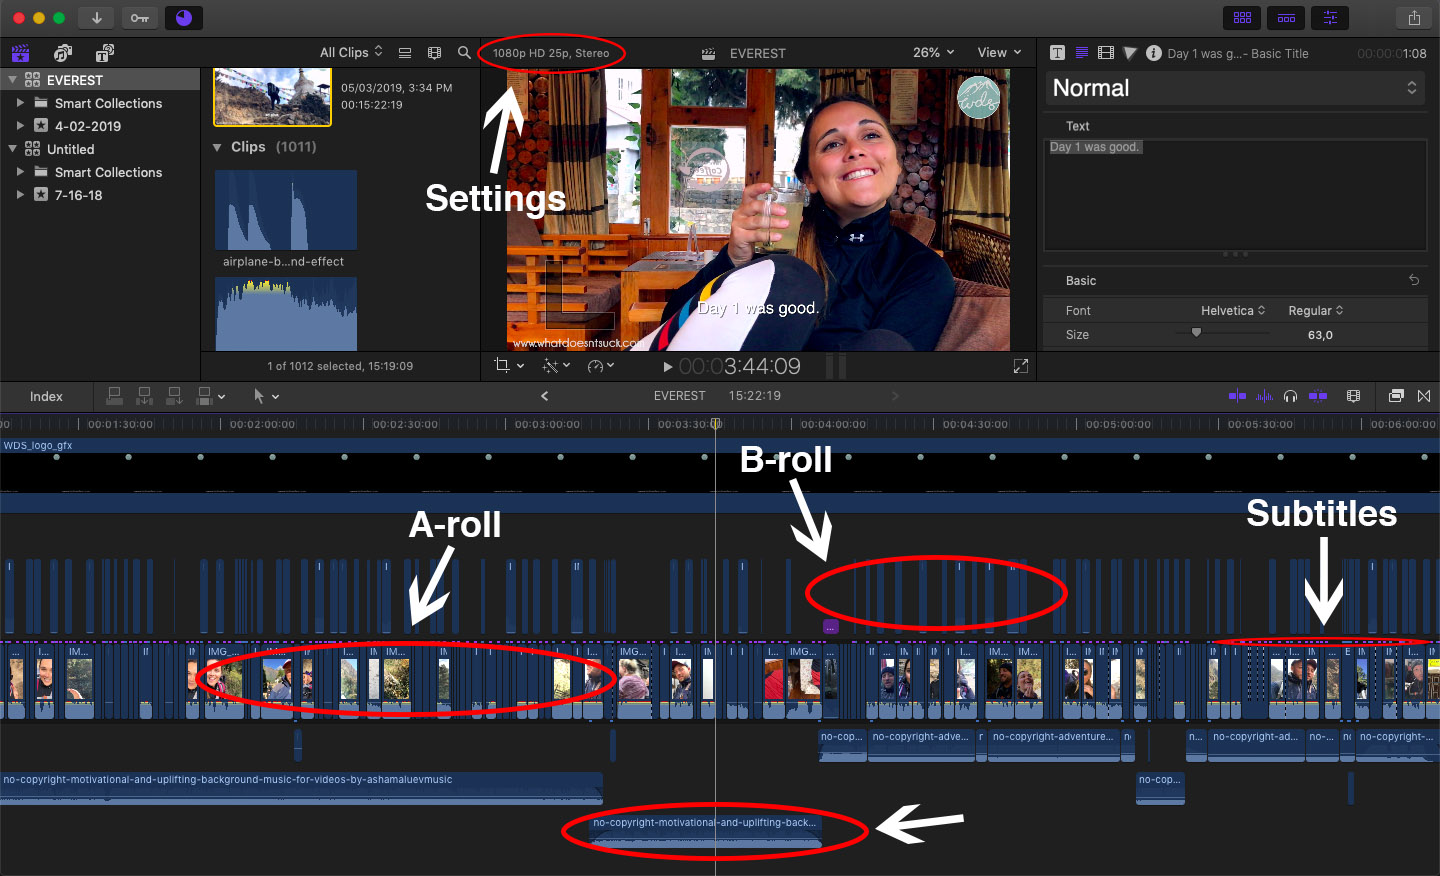
Once you get your project up and running, set up a timeline with the correct FPS you shot the videos in, drop in all your media and let’s get started!
I like to bring in ALL clips at one time, drop them all in the timeline and slowly start to go through them one by one.
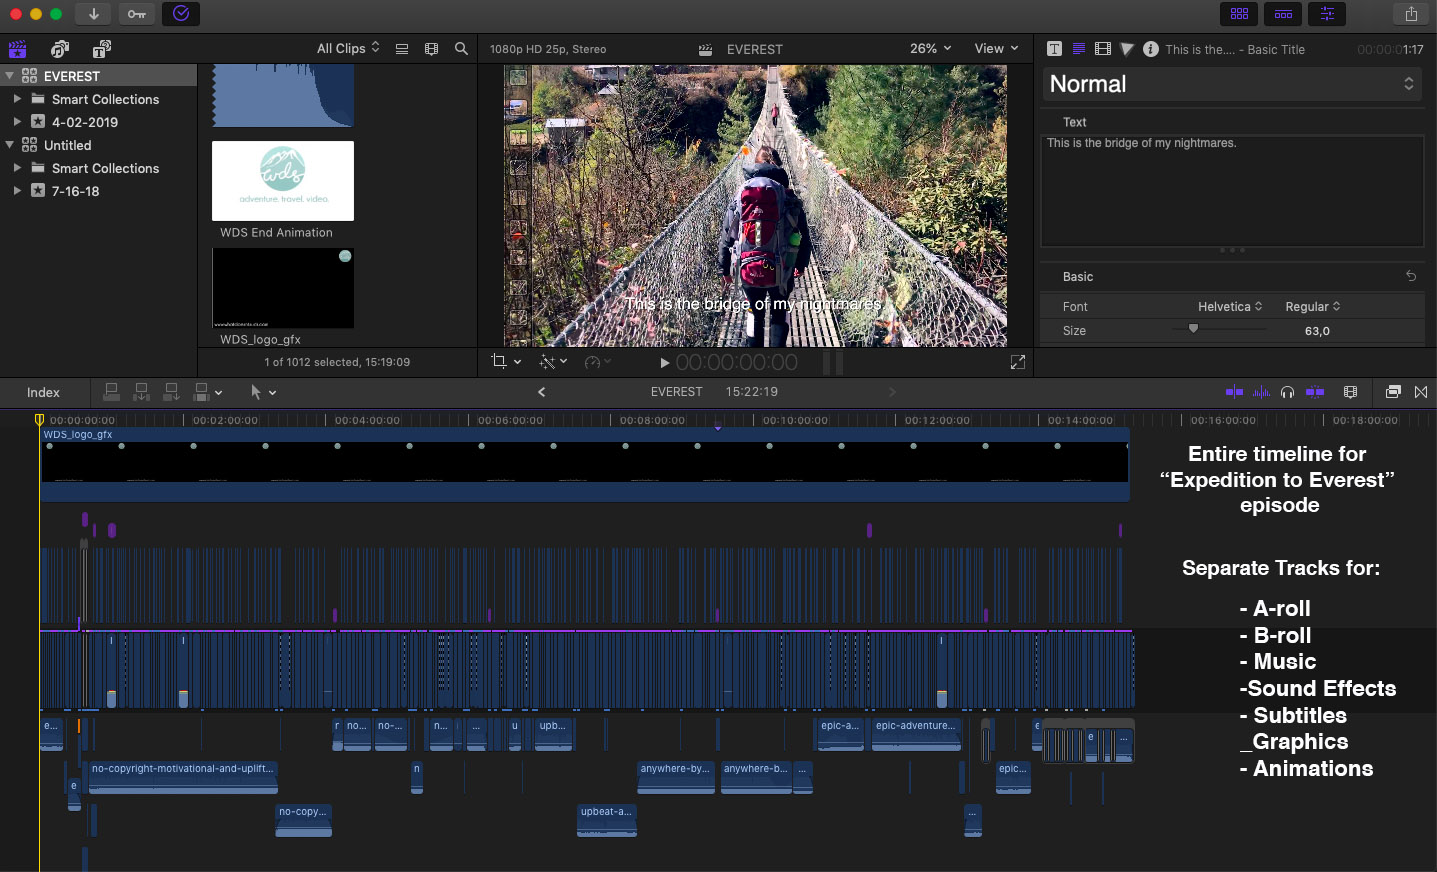
This can be a really scary thought, especially for a video like our “Great American Road Trip” where we filmed for 3-weeks and had over 2,000 clips including tons of drone and GoPro videos, but I like to see it all on the timeline, have a good cry, and then go from there. For that video we start with over six hours of raw video. The final episode was 23 minutes in length.
When you’re done crying after seeing all your footage on the timeline, you’re ready to move on to part 3.
How to Edit a Travel Video Part 3: Trimming the Fat
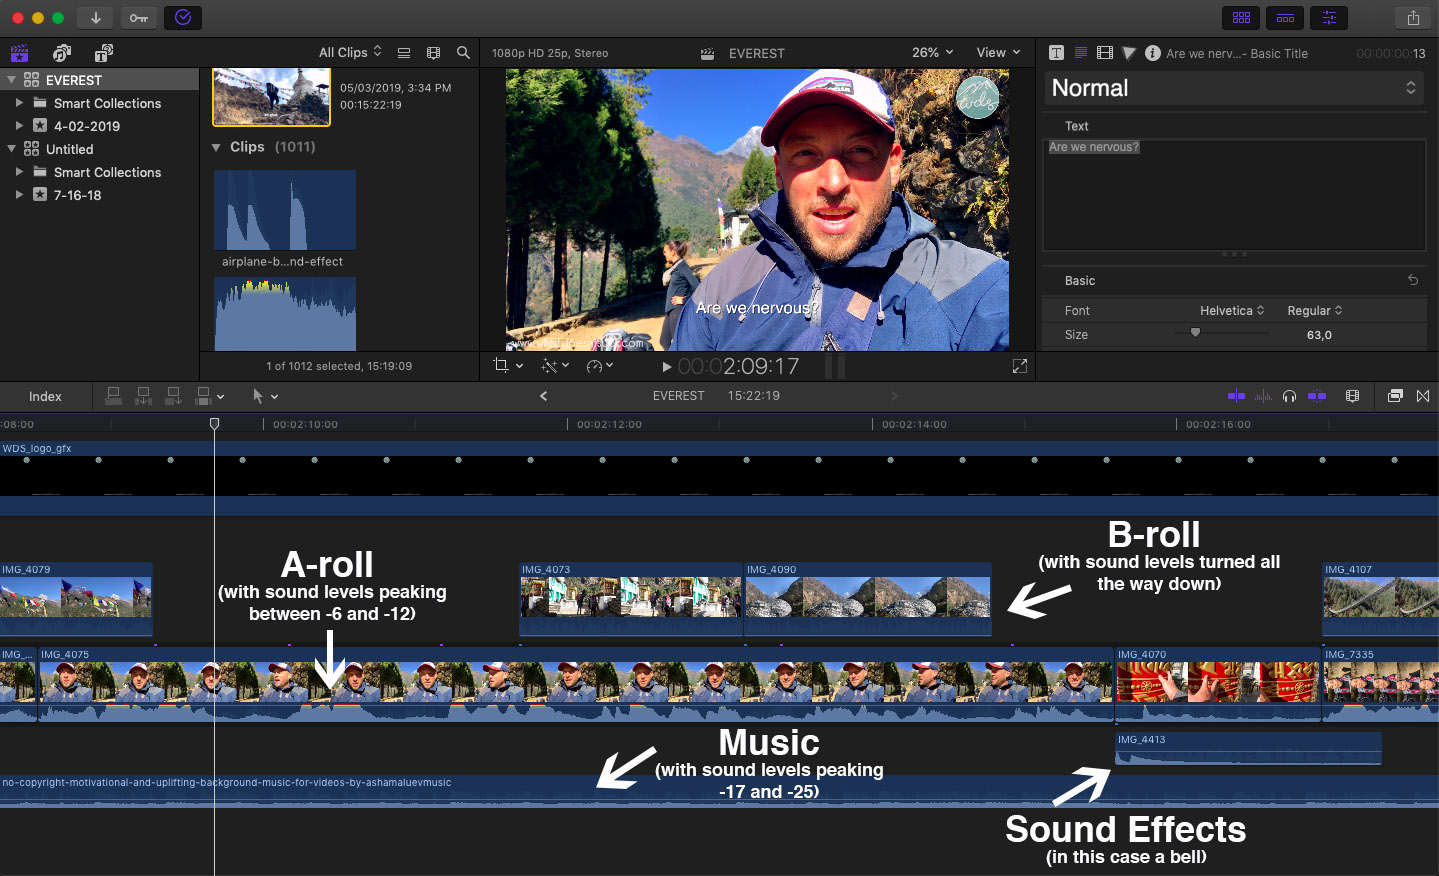
First, the basics. In video editing there are two types of footage, A-roll and B-roll. The former is any shot which has someone facing the camera speaking. The later is everything else. All the beauty shots of people, places, things, details, food, etc. Usually the A-roll will be laid to lay the foundation of your video, and the B-roll placed on top, or around, to support and further tell the story. Pretty cool, huh? Is it all starting to make sense now?
So many people have told us we should outsource our video editing, but we’ll never let go of the creative control of our videos. This is for a few reasons, but the main one is that we are the ones who filmed it, and as you know from “How to Film a Travel Video Part 2” we pre-visualized so much of it that we almost know where every single shot goes, we just have to put in the time going through them all.
What I like to do is watch all the clips one by one, and cut off the parts of the clips which are no good. We film A LOT so many times we will have the same shot three or four times, but one of them is always better than the others. This can be a tilt or panning shot of a city market, a building, landscape, etc. Find the one you like, clip off the bad parts and delete the others.
Ahh, doesn’t this feel good? We’re only chopping away a few seconds here or there but they’ll all add up and in a few hours you’ll have that three hours of video down to something much more manageable.
Once I have gone through and cut up all the B-roll shots (I usually skip over the A-roll on my first pass), I’ll turn off whatever music I am listening to and start chopping up the “talking head” A-roll video clips.
These clips will take more time to go through, but you can really start to see the layout of your video when you go through and start cutting up the talking portion of your video.
We talk a ton in our videos, which means what you end up seeing is about 5% of the footage we filmed. This means that we delete the vast majority of what we say, but the beauty of video editing is that you can chop up, mix and match, and patch together coherent thoughts even when they weren’t said that way.
We’ve said some down right stupid things when filming our videos, but the art of editing is that I can cover them all up. Once you have chopped out all the garbage and nonsense bits, you can form the sentences you need to have in the video and cover it up with B-roll.
In video editing, the splice between two clips that have been cut together to form a sentence is called a “jump-cut” and if you were to just play the talking head you’d see a jump in the cut between the two, but if you do it right and place some supporting B-roll over the cut, this will be completely unnoticed.
Don’t let someone speak for 10-seconds longer than they need to, trim the fat, get to the point and throw some B-roll on top to splice it together.
Don’t panic, all of this A-roll and B-roll nonsense will make sense in a minute :)
Remember, the people have about an 8-second attention span these days, shorter than a goldfish, so don’t waste time and give someone watching the opportunity to click away from your little baby you’ve worked so hard to create.
Keep hammering away for the next few hours on chopping down your footage, and when you’re ready come back for part 4, we’ll be waiting.
How to Edit a Travel Video Part 4: Telling Your Story
Now you finally are in a position to start to tell your story. If you’ve trimmed enough, you should have just the select B and A-roll clips you want without much fat around the edges.
Now you can start to re-order the content and place the correct B-roll on top of the A-roll segments to make scenes start to come alive. Remember, start each scene with an establishing shot, use supportive B-roll to bring what someone is saying to life, and use appropriate ending shots to finish each scene.
For example, if a particular scenes is of a museum visit, start with a shot of people walking into the museum, use B-roll of the exhibit over what they are talking about, and finish with someone walking outside, leaving the museum, or getting in a car.
Not only will you do this for each scene, but for the video as a whole as well.
Once you place all the B-roll on top of your A-roll it should cut your overall video length down by about 40-50%, which should leave you pretty close to a finished product, or at least getting close.
Next, start to comb through any additional supporting or beauty footage you filmed while on your trip. For us, this includes GoPro and drone footage which, once chopped down, adds that little extra spice or “wow factor” to scenes to really bring them alive.
Adding a timelapse of a car driving through the woods, of a sunset, or an epic revealing drone shot of the city you’re in will really make this video pop.
Once I have all this content chopped down as lean as possible, it’s time to bring in the music and really bring this beast to life.
How to Edit a Travel Video Part 5: Bring in the Music!
If you’ve watched any of our adventure travel videos, you know that music is a huge driving force in making sure the pace and excitement carries the viewer through the entire video, and this is done very much intentionally.
With such short attention spans, you’ve got to keep the audience engaged and with music this can be done quite easily.
You can find copyright-free and royalty-free music many places on the internet, and laying down some energetic and upbeat music to your videos will give them just the feeling you need to keep people watching.
I like to lay a song down once I have my clips chopped up so that I can edit the clips to a beat and really drive the momentum of each scene with music. You’ll feel it when you get in a flow and a scene is just working perfectly, it feels amazing.
By bringing in music under each scene it will also help you realize how quick each shot should really be, sometimes a shot that took you 10-minutes to film will only be used for 1-second, and that’s ok! Kill your babies, I know it’s hard, but it has to be done.
By editing to a beat, you keep your pace moving along, keep a solid flow from each scene to the next and will see a clear picture of how the video needs to be laid out.
I like to use motion to propel each scene, and the transitions between, with visual shots like timelapses and drone footage. This keeps the edit fresh and the viewer moving along without opportunity to click away.
Once you’ve added all your music you’re almost done, but we’ve still got a few more steps.
How to Edit a Travel Video Part 5: Your Intro
This is not something everyone does, but we rely on it like gospel. Again going back to the short attention spans of most viewers, we use edit together a sexy and fast-paced intro to start each video which is crammed with the most beautiful shots, funny clips or impactful sound bites to hook our viewers.
This trick allows them to see what is in the video within the first 5-seconds and hopefully get them excited enough to stick around and watch the whole thing.
You can have the most amazing footage on Earth, but if your viewer clicks away in the first few seconds and has no idea it is there, what is the point?
We think it’s great our travel videos have been viewed as many times as they have, but what we’re really happy to see is when people are tagging their friends, commenting and sharing on our videos, that is what we consider a success, and if they aren’t hooked from the start this will never happen.
So don’t hold back, trick your audience into watching your videos, and if they’re good enough they’ll be happy you did. The worst mistake you can make is by thinking someone cares enough to watch your 15-minute video when it could have been even better if you’d chopped it down to two. Trust us, no one cares. Have you seen our “48 Hours in San Francisco” video? Point proven.
Keep the intro short, from 5-20 seconds and you’ll be doing your video, and ego, a huge favor.
How to Edit a Travel Video Part 6: Sound, Color, Graphics and Subs
By far the most tedious and boring, but without working on these steps it’s like buying a brand new suit, fitting into it perfectly, and then heading out on a date without brushing your teeth or combing your hair - it just kills the whole vibe.
A vast majority of people watch videos on mobile these days, and not all of them can listen while they do, which is why subtitles are extremely important. We’ve also had tons of deaf followers send us messages thanking us for adding subs so they can enjoy our terrible jokes too, which we love to hear.
Taking the time to balance your sound levels, for both music, ambient, and speech is extremely important. You don’t want someone throwing down their phone because you’re yelling in one part and inaudible in the next, it’s just rude.
The final touch is adding that little bit of spice to your video, in the form of color correction and graphics. It’s like when you go to a fancy restaurant and the scrambled eggs have paprika on them. You’re not really sure what it does to the eggs, but you like it when you see it and it makes you feel like a fancy girl.
Taking the time to tweak the color on your clips will really make them pop. Create a template and copy to to all your clips. Just a touch of saturation and contrast can make a huge difference.
If you’re feeling adventurous and really want to go the extra mile, think about adding in some graphics to your video as well, but DO NOT rely on them to tell your story.
If I see one more travel video which has a slide saying “And then we got to the peak”, because someone was too lazy to film it, it clearly looks like a bandaid and is extremely off putting. Only use graphics if they bring to life of enhance the video you’ve created. You know it when you see it.
How to Edit a Travel Video Part 7: Voila! You’re Done! Almost…
Ok, this travel video is looking pretty nice, now all there is left to do is export and upload, right? Not so fast.
If you’re creating this for any type of social media, you’ll probably want to work on the following:
A high-res 16x9 export for YouTube and Facebook with NO subs
A high-red 16x9 export for YouTube and Facebook WITH subs
A short export of just the intro to act as a teaser
A square export to post on Instagram
Short 15-second clips, or the teaser, vertical export for Instastories
I know, It’s a lot, but in 2018 this is the world we live in, so go the extra mile to give your video a fighting chance of being watched.
Once you export the hi-res versions use a program like MPEG-Streamclip to compress the videos down to a small enough size to easily load to your social channels and you’re good to go.
How to Edit a Travel Video Part 8: Final Thoughts
Editing travel videos can be a daunting task, but I hope this guide has been helpful to you and broken down some of the mysteries behind how, at least we, edit and put together our videos.
We absolutely love bringing our travels to life, and get so much joy out of sharing our adventures with you all, but it is also a lot of work.
We don’t blame you for wanting to just throw your phone away and head out to enjoy your holiday without your phone in front of your eyes the entire time trust us we’ve done this many times, but if you want to be left with an awesome memory from a trip and have the time and energy to create a video, we hope this is as valuable to you as it was fun for us to create.
Enjoy, be creative, and shoot us over any questions you’ve got. We’d love to help.
Happy editing!
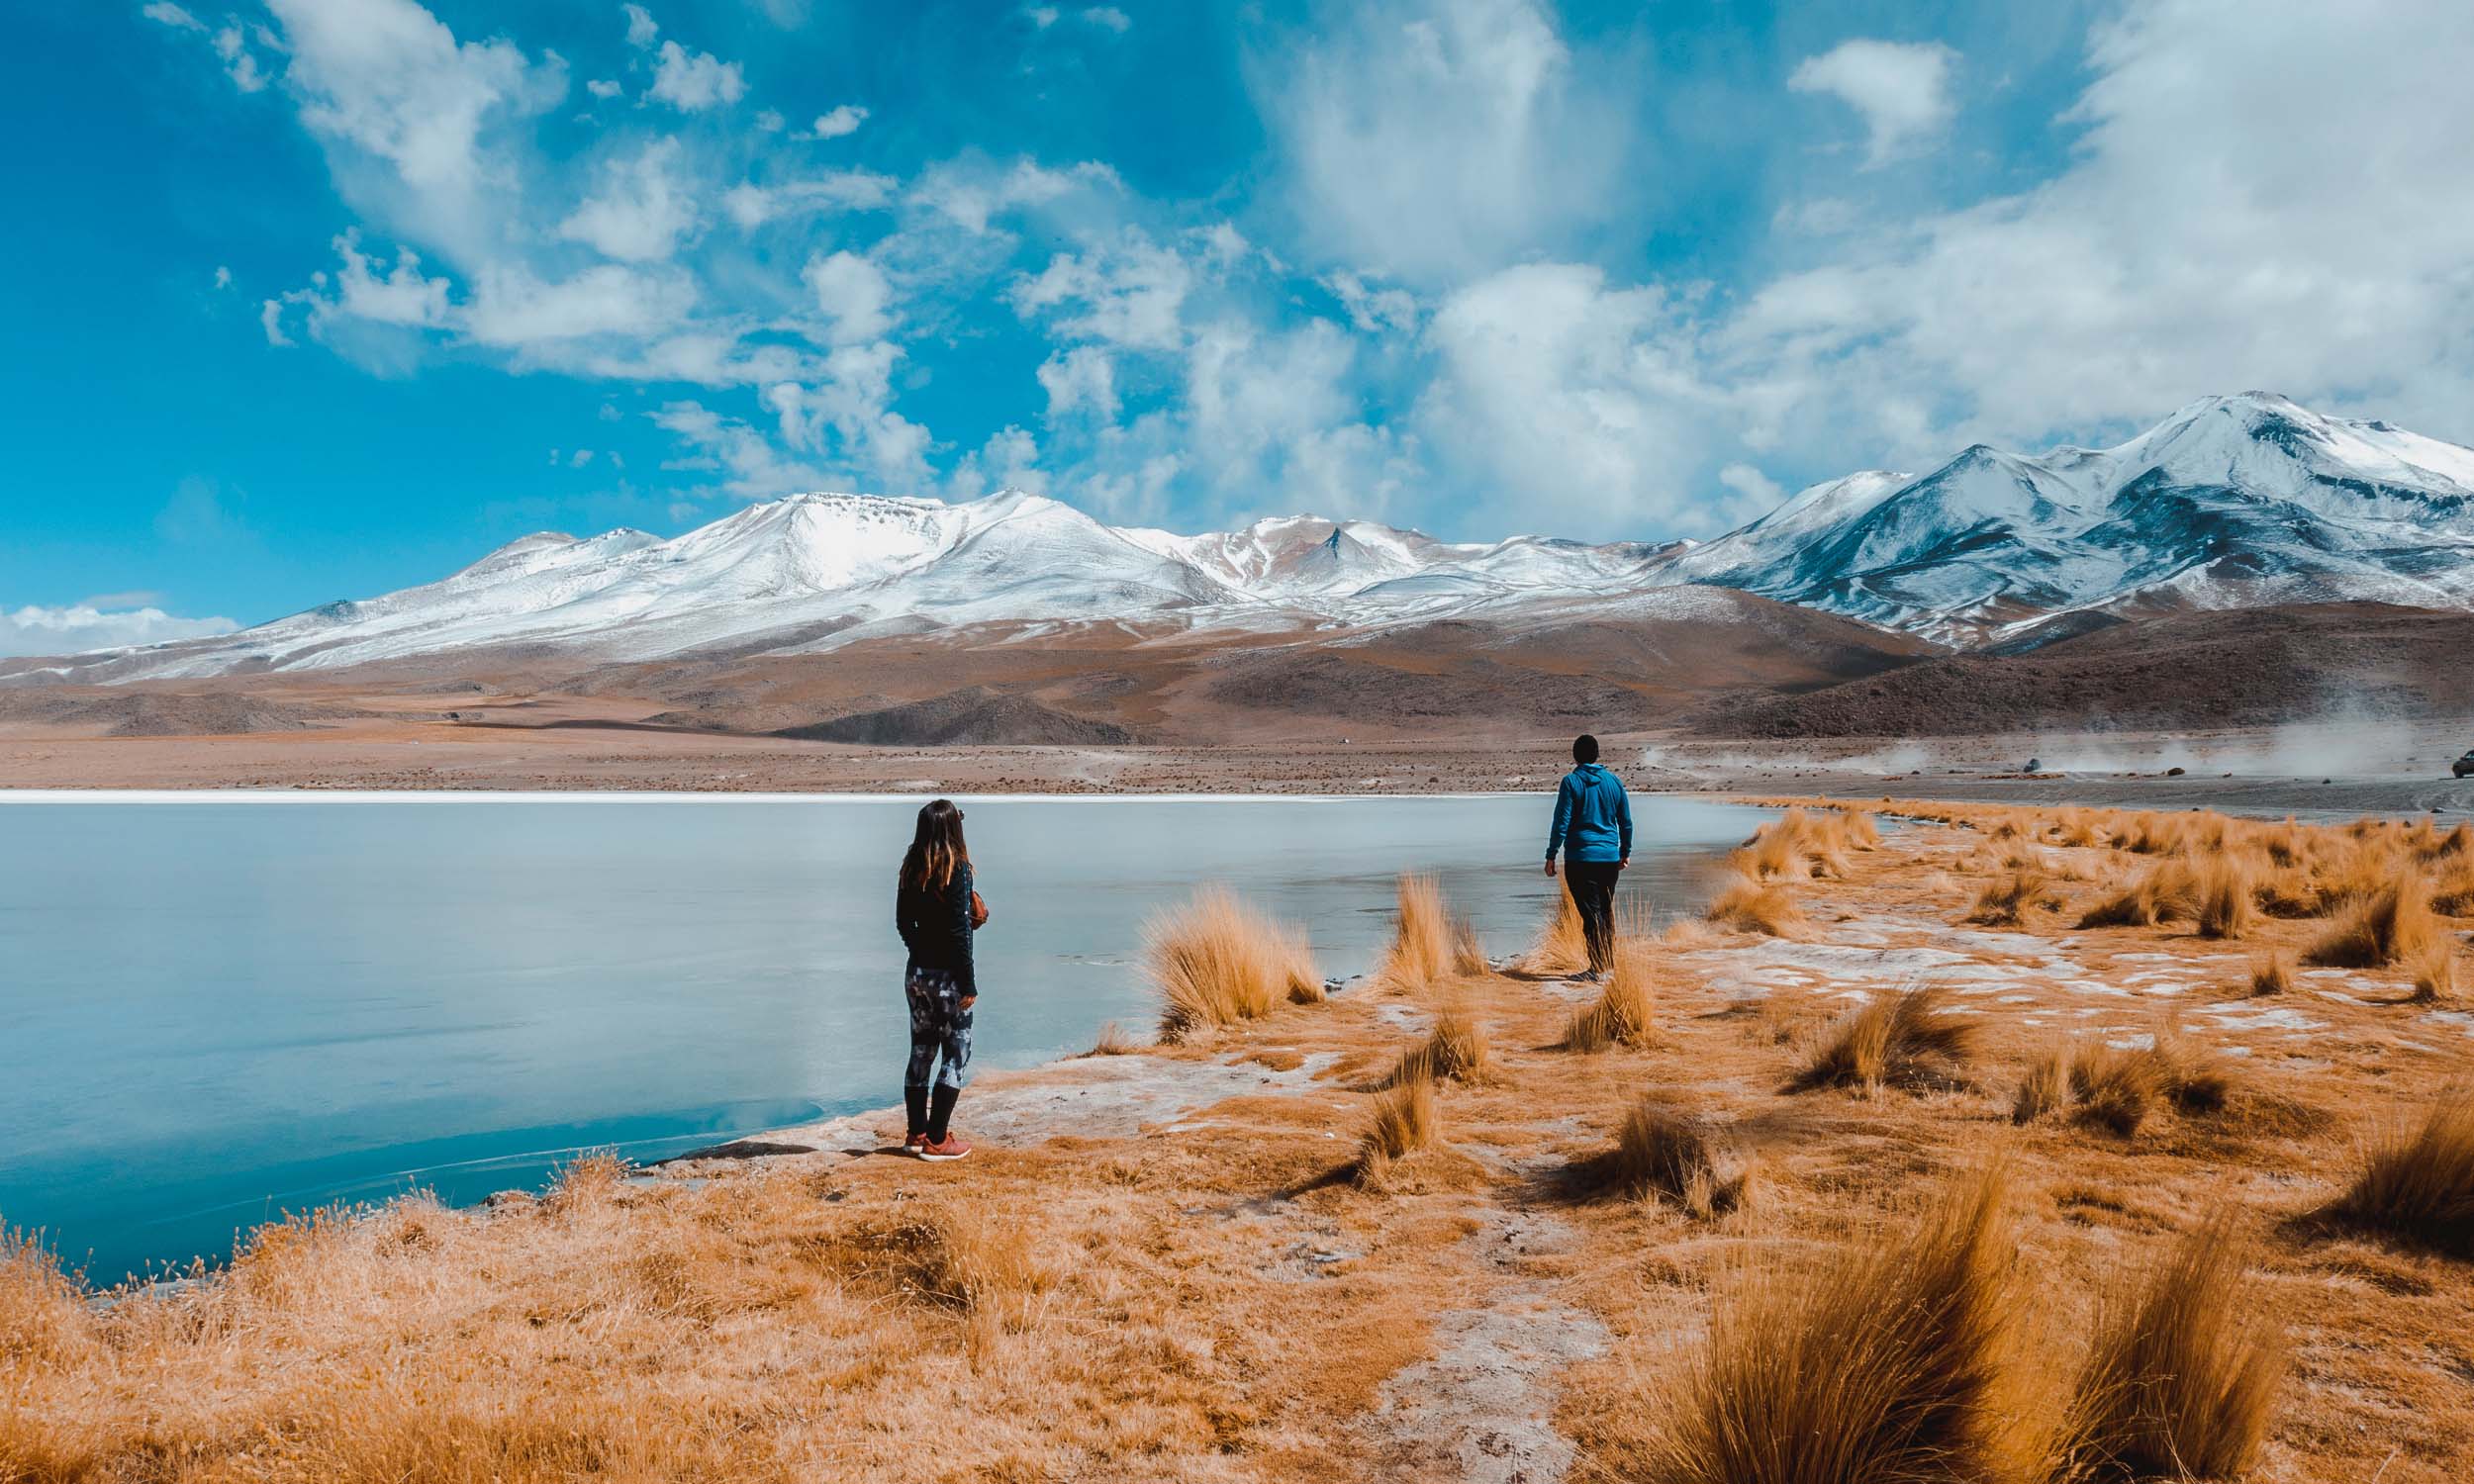
Anne and I staring in amazement at the beautiful mountains high up in the Uyuni Salt Flats outside of Uyuni, Bolivia in July 2018.